X-ray technology ensures quality during production of composite pipes
2,189 million meters of multi-layer composite pipes were manufactured worldwide by over 150 manufacturers in 2013. Combined, these pipes would circle the earth 53 times, or have a length of almost 3 times the distance from the earth to the moon and back. 10 years ago, the worldwide production volume was about 690 million meters. According to a study of KWD Global Pipe 2013 , the trend for the coming years is pointing up. At the same time, quality requirements for products are increasing.
Development of multi-layer composite pipes
Before the establishment of multi-layer composite pipes at the beginning of the 1980’s, lead pipes were used for the installation in the building services sector. Due to the toxicity resulting from the potential chemical compounds from the lead, the production of lead pipes was decreasing. Since 1970, these pipes have not been used for drinking water and have been replaced by copper pipes. The use of copper pipes is also declining. The advantages of multi-layer composite pipes are obvious: They are non-corrosive, more flexible and more cost effective. Today, multi-layer composite pipes are being used worldwide and produced in more and more countries. In 2013 for instance, the number of aluminum multi-layer pipes produced in Asia grew to 55% – in comparison to 48% in 2010. In addition to this growth, the end users demand for quality for the manufactured products is also increasing. Manufacturers of multi-layer composite pipes are striving to further increase product quality in order to stay competitive in the market. At the same time, production costs have to decrease. Measuring techniques with X-ray technology makes both possible.
Application, construction and quality requirements
Multi-layer composite pipes are used for instance in the building services for drinking water, heating and cooling installations, under the floor and in walls. Common diameters that can be reached are from 14mm, over 16mm up to 63mm. Specialty pipes can have diameters up to 110 mm, these are being used for water supply applications.
A multi-layer composite pipe is made of up to 5 layers: a PE inner pipe, an adhesive layer, an aluminum tape (butt welded or lap welded), another adhesive layer and a PE outer pipe. By means of an online quality control during production, pipe specifications can be precisely fulfilled. Wall thickness’ can be 2 to 10mm, depending on the manufacturer and application. Pipes which conform to a certain specification are especially required for easy processing, for instance for the connection of the pipes by so called fittings. The quality control, moreover, saves on plastic material and, additionally, ensures cost reduction at the same time.
Common available technologies for quality control for composite pipe extrusion lines are ultrasonics, the diameter differential measuring principle or gravimetrics. These technologies are suitable for classic diameter measurement of single layer products, but are limited due to their function and dependence on environmental influences.
Ultrasound is only suitable to a limited extend for the quality control of composite pipes. The reason is that the ultrasound cannot penetrate the aluminum layer, which is used as a vapor barrier. Therefore, the wall thicknesses of the inner tube, the vapor barrier and the outer tube are not measurable. Ultrasound measurement is typically done in a water bath because the water is required as coupling medium for the transmission of sound. Precise temperature compensation is important as the propagation speed of the ultrasound, which is used for the evaluation of the wall thickness, is dependent on the temperature and material.
The diameter differential measuring principle is based on the comparison of measuring values, which are measured before and after the extruder and is for that reason only applicable for the outer layer. Furthermore, although, this approach gives information about the wall thickness, the concentricity cannot be determined with this technique. Thus, it is impossible for the manufacturer to optimize his production in regards to quality and material reduction.
During quality control by means of gravimetrics, the amount of material that is fed into an extruder, is being controlled. This technique again only takes the wall thickness into consideration and not the eccentricity of the pipe and in regards to the eccentricity measurement is, therefore, typically combined with other technologies.
The precise measurement of all product parameters without any dependency on environmental and material influences can be ensured by using X-ray technology.
Quality control with X-ray technology
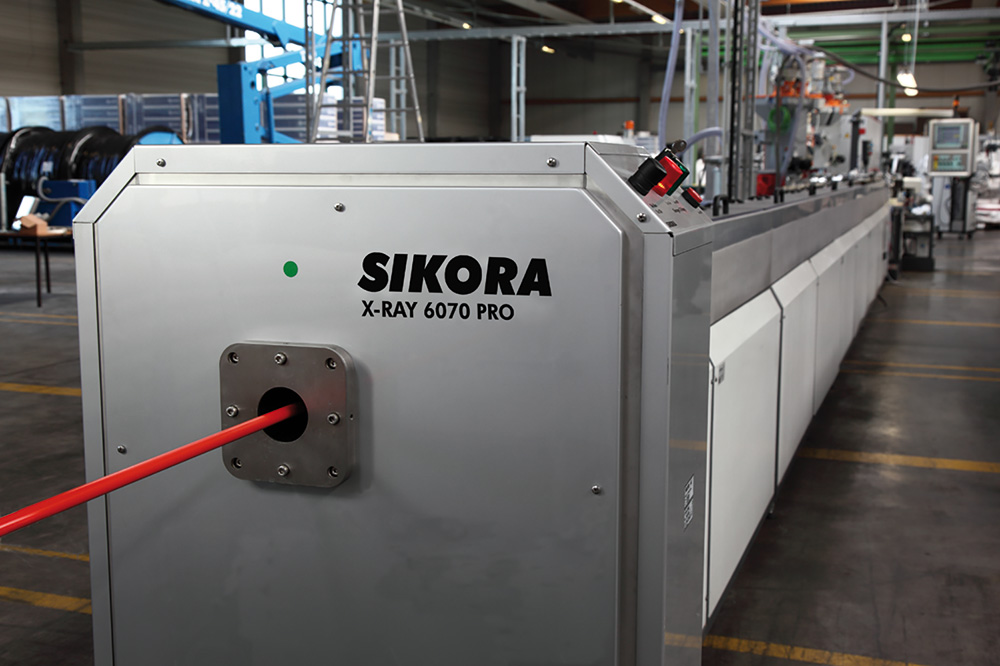
Since the early 1990’s, SIKORA has been offering X-ray technologies for the continuous quality control of stranded wire products during production. For quality assurance of composite pipes, manufacturers are using X-ray technology, such as the X-RAY 6000 PRO. Depending on the requirements, the device is installed directly after the extruder (hot measurement) or at the end of the line (final quality control). The 4-point-online measurement provides values for the wall thickness, eccentricity, inner and outer diameter and ovality immediately. These are calculated and visualized in real time with the ECOCONTROL 6000 processor system. The system measures up to three different material layers. For composite pipe these are the outer diameter and wall thickness of the PE inner pipe, the aluminum layer and the PE-outer pipe. With the ECOCONTROL 6000 these measuring values, as well as the eccentricity, are displayed numerically and graphically as pipe cross sections at eight points and allow the operator to center the extrusion tool. The use of the X-ray measuring system is especially effective in combination with the automatic line speed or extruder rpm control. By controlling the minimal value, only the required amount of plastic material is being used, thus reducing costs. With the use of the X-ray measuring system, typically a reduction of 80µm of a 2mm wall can be achieved. This means 4% of the material can be saved. This represents a cost reduction of about 100,000 €/per annual. (extruder output: 600 kg/h, operating time: 6,000 h/per annual, material costs: 1.5 €/kg).
X-Ray technology for quality control at the composite pipe production
Also in extrusion lines, in which the measurement of only one material layer is required, manufacturers are using the X-ray measuring system X-RAY 6000. A 7” TFT monitor, including touchscreen operation, is directly integrated in the X-RAY 6000 gauge head, where all measuring values are displayed graphically and numerically. In combination with the processor system ECOCONTROL 6000, 1000 or 600, the automatic control of the line speed or extruder rpm is also possible with this system.
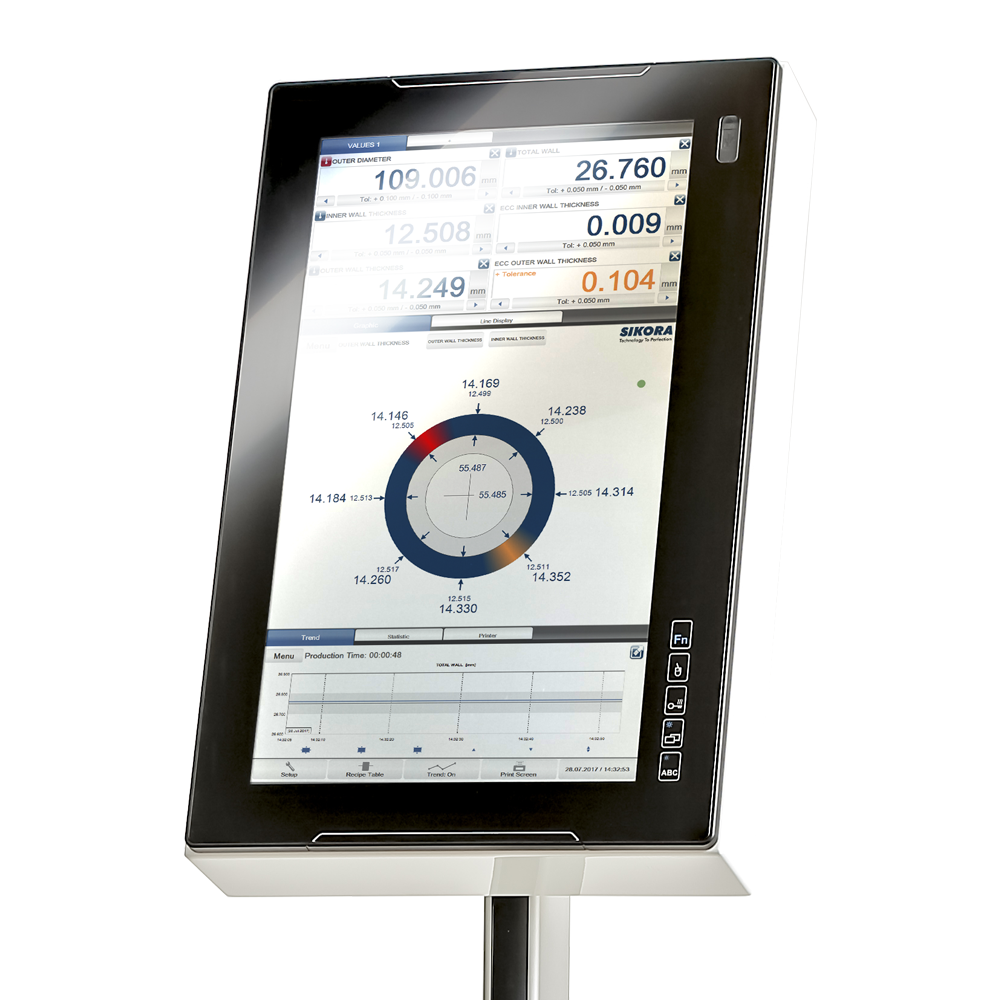
The measuring values of the X-ray measuring system are displayed at the processor system.
X-ray measurement method
The technology of the X-RAY 6000 PRO is based on an imaging method. Two X-ray tubes, aligned at right angles to each other, illuminate the pipe transverse to its axis. A line sensor is positioned opposite each of the two X-ray tubes and is equipped with a scintillator that transforms received X-rays into light. This creates an image of the pipe within milliseconds. In this way, accurate values are recorded continuously online during the running production process. The analysis is carried out directly from the X-ray image and provides accurate measuring values. A coupling medium is not required, as it is for ultrasound techniques. In addition, the technology is not dependent on the temperature of the extruded material.
The fundamental principle of the X-ray measuring technique is the different attenuation of materials based on the periodic table of the elements. The attenuation (µ) of the X-rays is proportional to the atomic number to the power of 3 (µ~Z3). The ethylene monomer (PE) is made out of two carbon and four hydrogen atoms. This corresponds to a very small attenuation. The metal aluminum has 13 protons in its nucleus and, as a result, has a stronger attenuation than PE. The recording of materials with different attenuations leads to a visible contrast of each layer and provides measurements of the pipe dimensions with greater than micrometer precision.
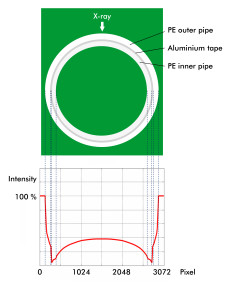
The different attenuation of the materials leads to a visible contrast in the X-Ray image
3-axis X-ray measurement
For the production of composite pipes, a 3-axis measurement can be an important tool for quality control. The measurement in 3 planes allows for a six point wall thickness measurement and, in combination with a high measuring rate, the detection of defects, such as blisters between the aluminum and the inside of the pipe, as they could arise from a missing adhesive agent. Blisters reduce the product quality and eventually lead to scrapping the pipe. Composite pipes are typically produced at 30m/min. At this speed, which is 0.5m/sec., the triax-X-ray device measures the pipe at up to 100Hz every 5mm. The smallest blisters and defects in the pipe are reliably detected. A time intensive and cost consuming ball test, where a ball is shot through the pipe in order to detect possible irregularities, is unnecessary. Besides the wall thickness, the outer and inner diameter as well as the eccentricity of up to three wall thicknesses, the system measures the ovality of the pipe. The analysis and controlling of the measuring values is done in the same way as with the X-RAY 6000 PRO.
The available X-ray technologies cover product diameters of 0.7mm up to 650mm. The X-ray measuring system X-RAY 6000 PRO is used in the production of big composite pipes of 63mm up to 110mm. The X-RAY 6000, for the measuring of one material layer, is suitable for composite pipes of 14mm up to 63mm. The triax X-ray is used for products of 6mm up to 65mm.
Conclusion
With the worldwide increasing production of multi-layer composite pipes, the quality requirements for the products are also increasing. Online quality control of composite pipes by means of X-ray technology is becoming more and more important. With the use of the X-RAY 6000 PRO directly after the extruder, the product parameters of all three material layers are being controlled. In combination with ECOCONTROL processor systems, the X-ray technologies contribute to automatic control under consideration of the minimum values and help to continuously improve the production process. The goal is to supply exclusively high quality pipes at competitive prices to the customer.

